Soft Washed Herringbone Mitts

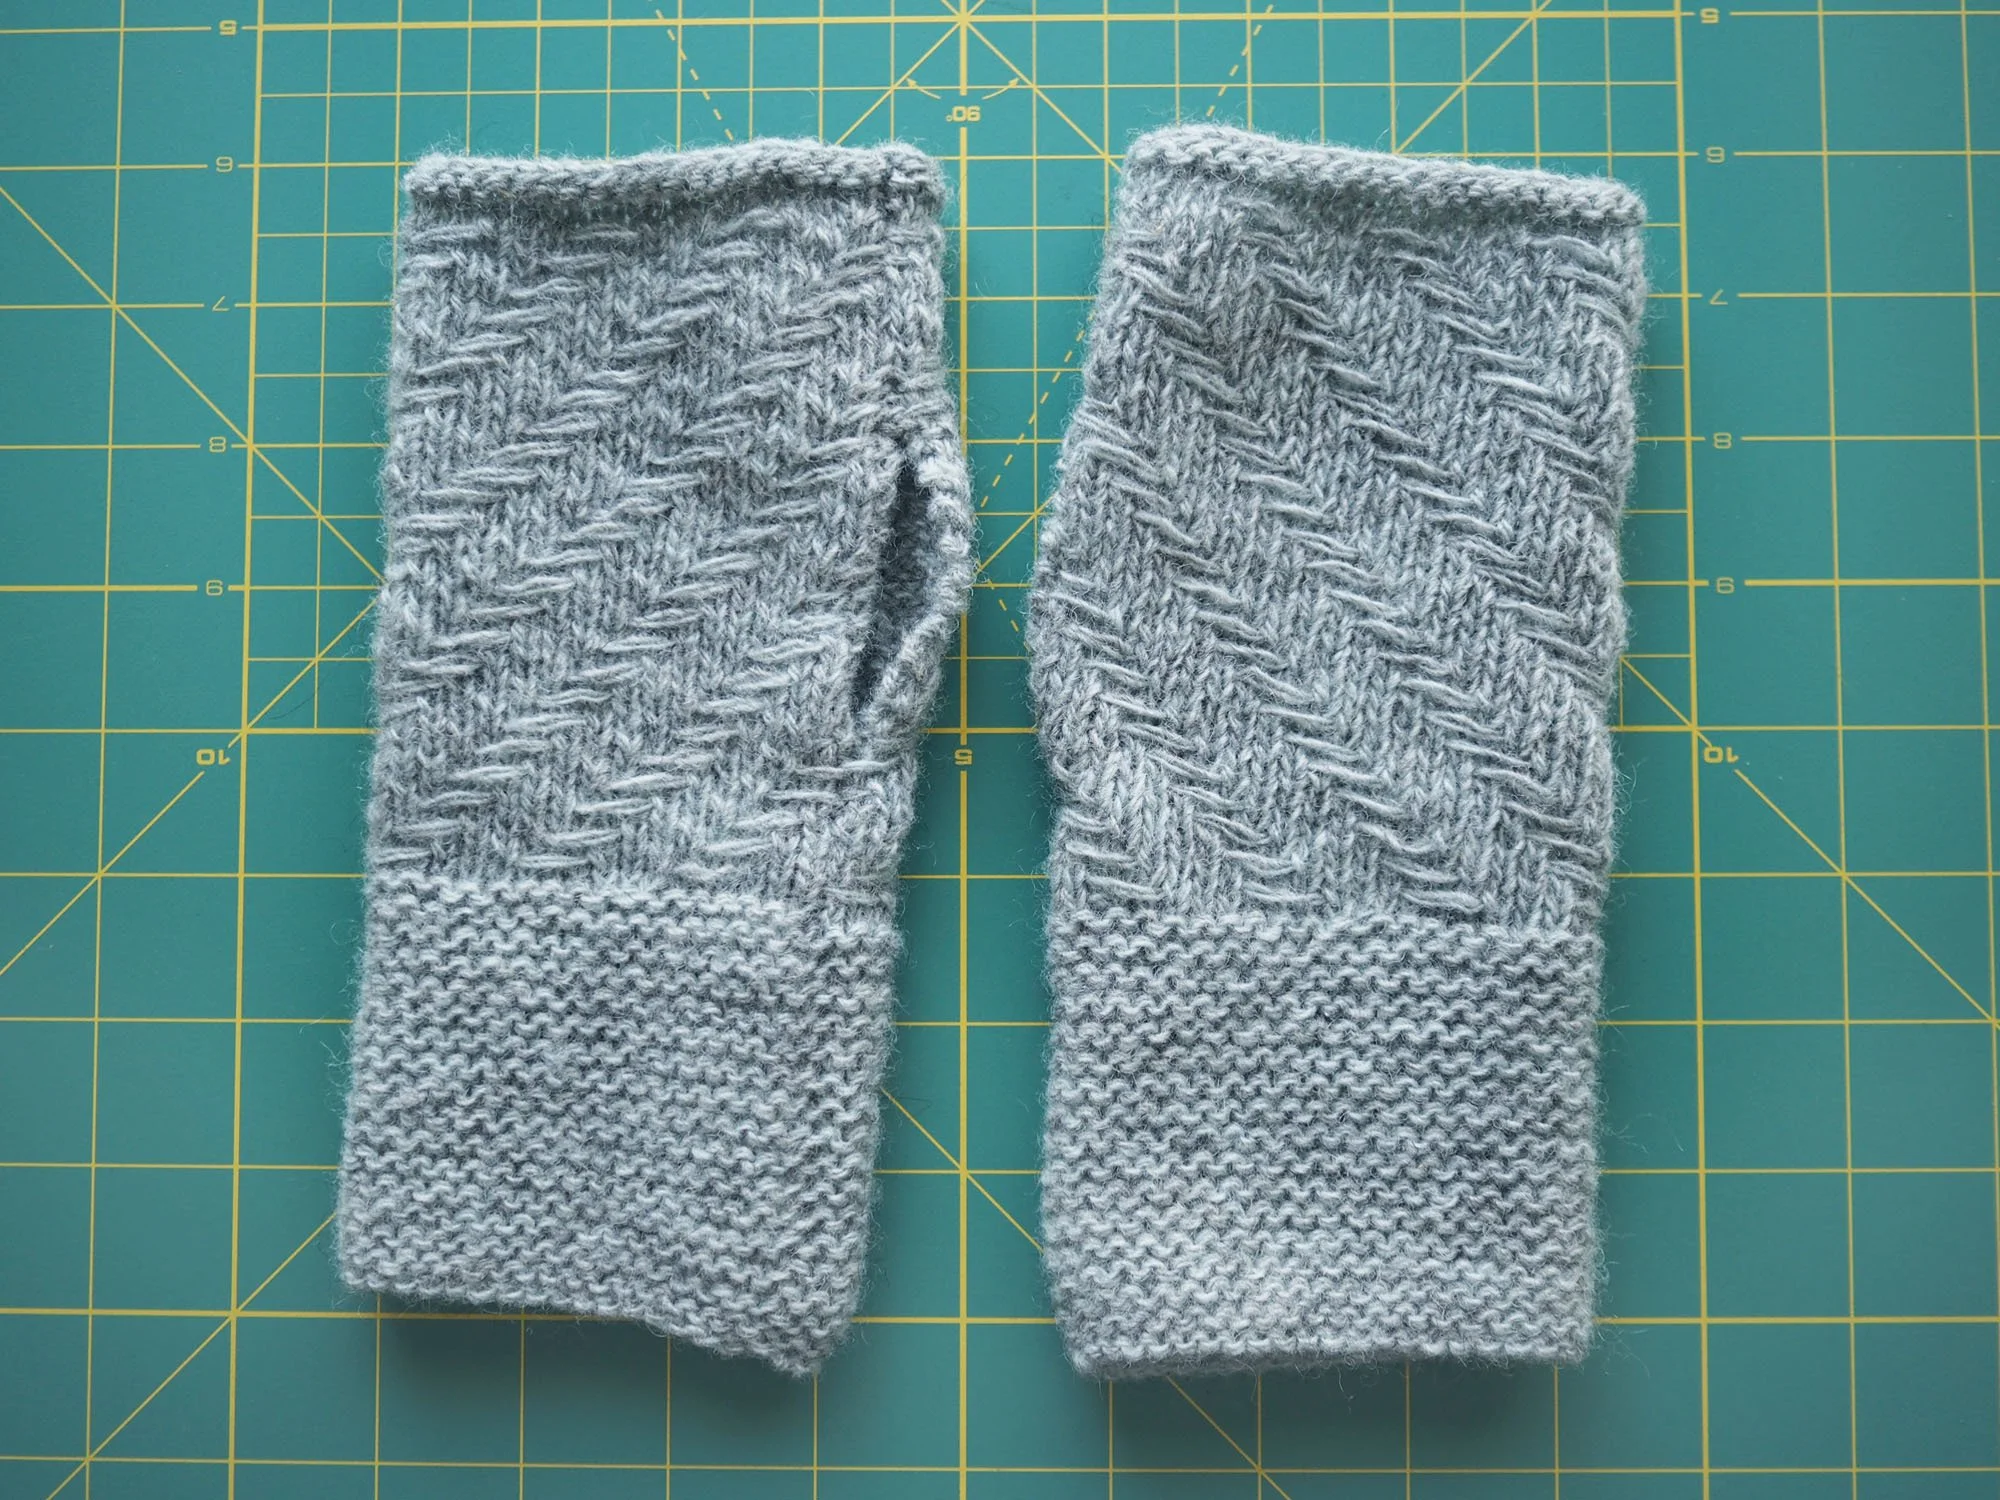
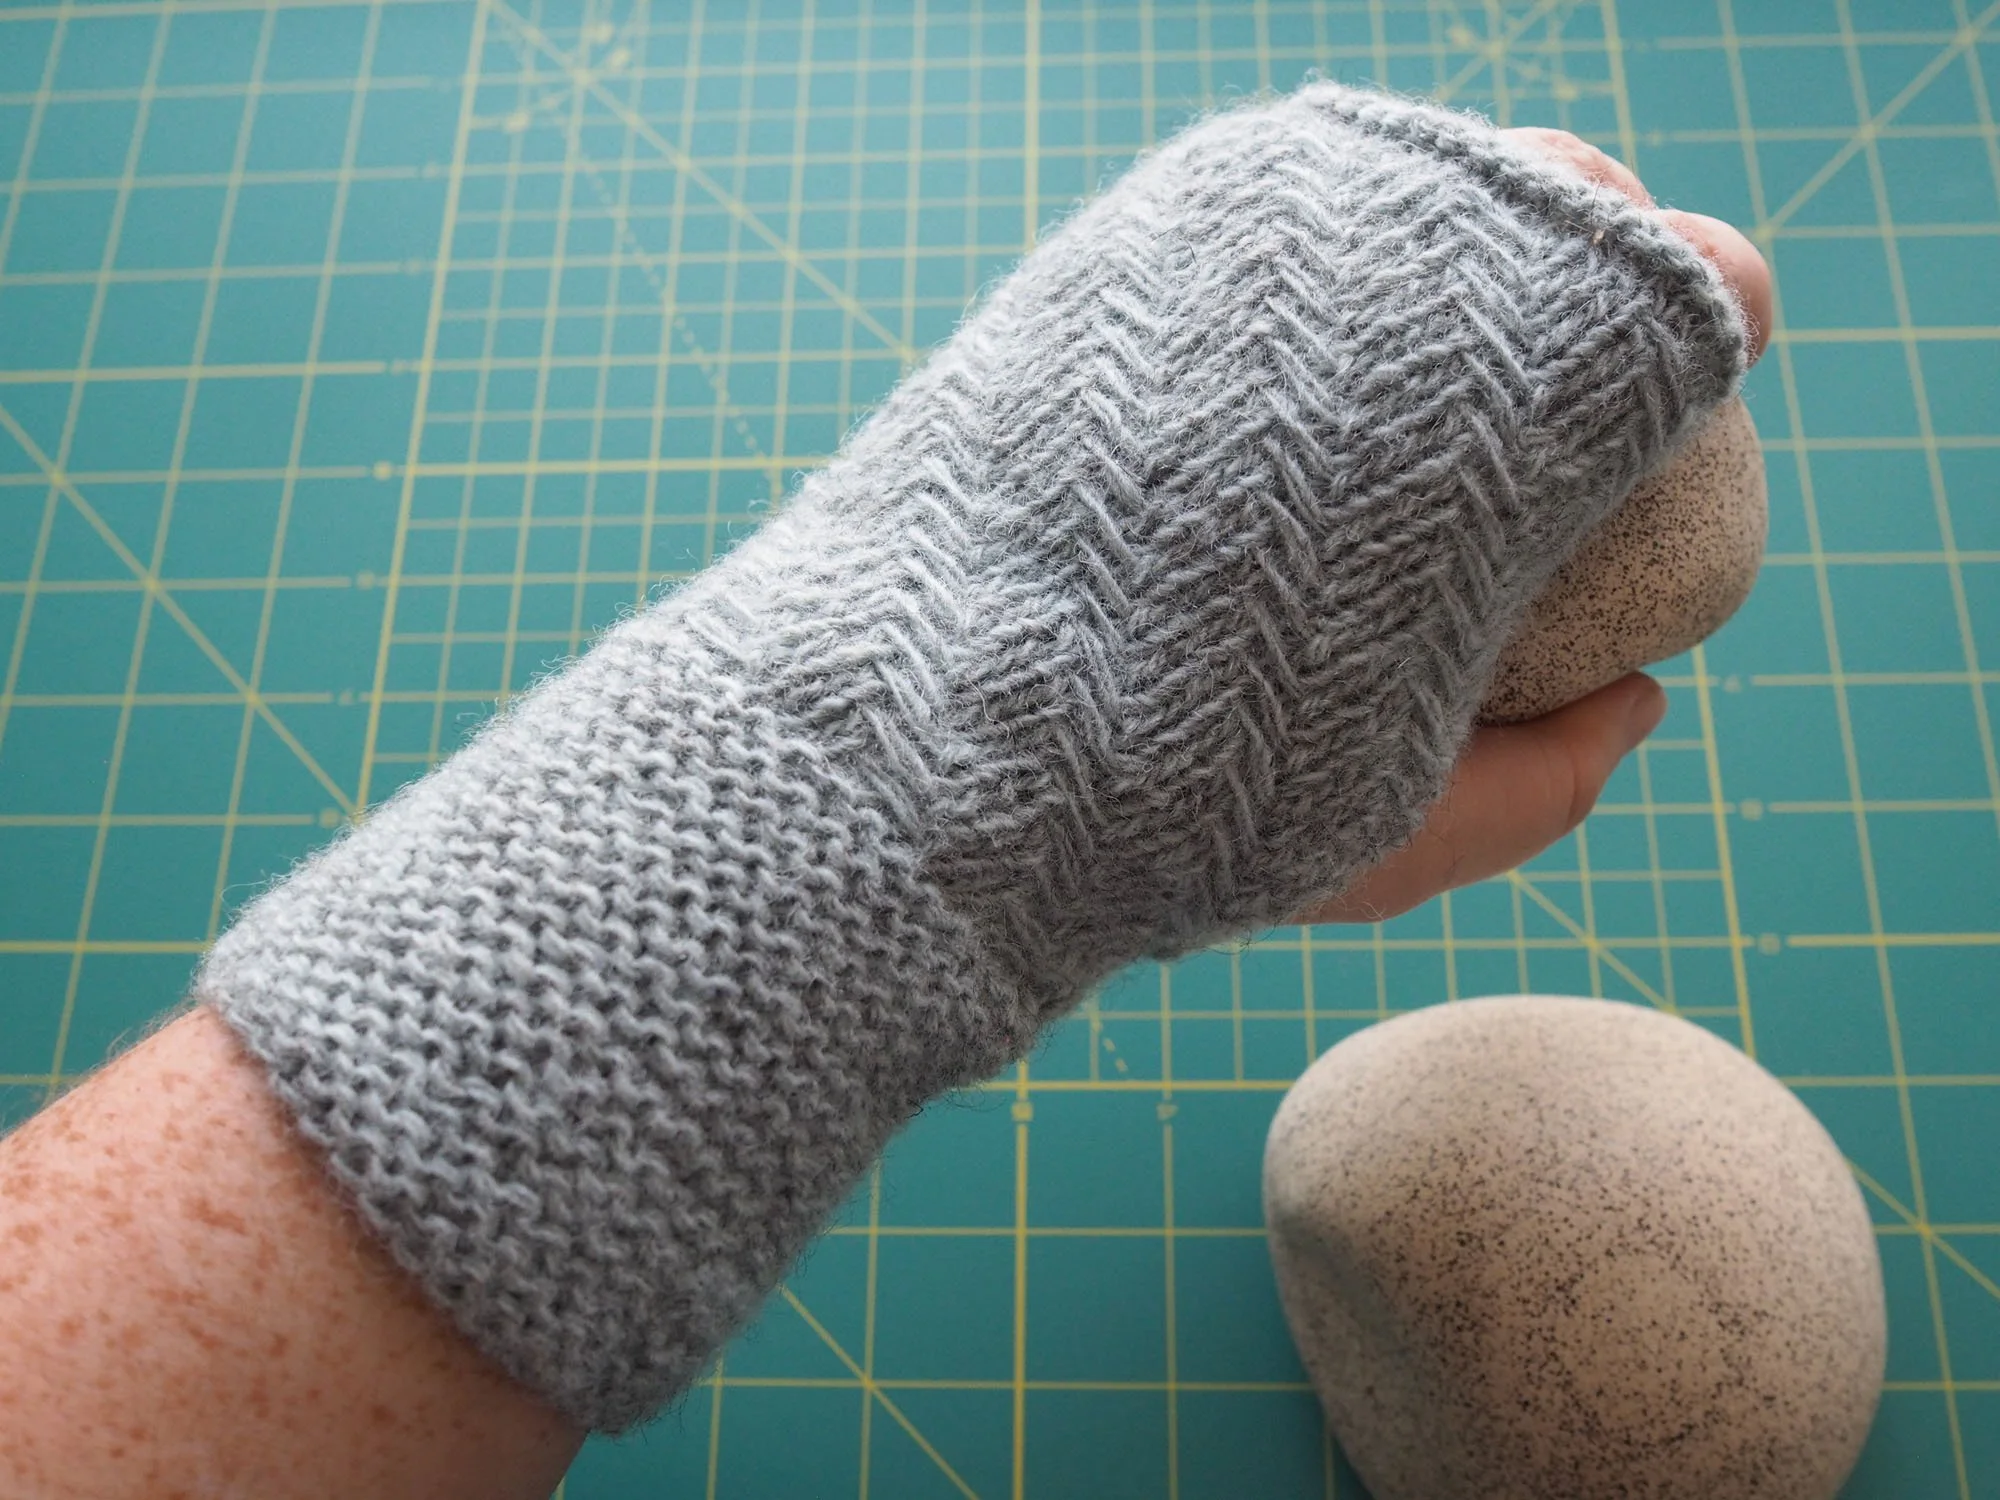
Pattern/Technique: Soft Washed Herringbone Mitts by Churchmouse Yarns

Modifications: n/a

Materials: 1 skein of Isager Spinni in color 10s held double

US 4 & US 6 knitting needles

New skills: n/a

Lessons/Notes: The herringbone stitch was really fun and straightforward which made it really easy to get into a rhythm without needing to reference the pattern. I think that my gauge was a little off the pattern, so my herringbone isn’t as balanced as in the sample pictures, but I still really like the look.

Followed instructions for washing (warm wash / cold rinse). The fabric got quite a bit softer after washing, though I still don’t think I’d use this yarn for a sweater.

While seaming (used this tutorial), I tried out 2 different approaches:

  • On the RH glove I seamed the edge of each purl bump (ignoring if it was the top/bottom) which gave me a very flat graft. I think I prefer this method in this particular application.

  • On the LH glove I seamed so that I was stitching into the bottom purl bump on the left side of the graft and the top purl bump on the right side of the graft. While the join is technically more in pattern, this did create a slight ridge on the inside of the mitt and a slightly visible indent on the outer side. I also made a slight mistake on this side where I think I skipped the first row of garter stitch so I have an extra ridge of stitches at the top.

What I'd do differently: Knit a gauge swatch so that my herringbone is more balanced.

Care: Hand wash, dry flat.

Red Sling Bag

Pattern/Technique: Fanny Pack by Sew Joyful Studio. Note: even though I’m pretty sure I printed the pattern pieces at 100% scale, all of the pieces were slightly too small, so I had to measure everything manually.

Modifications: Used 1.5” webbing instead of the 1” webbing specified. Increased the side wing pattern pieces by 1/2” where the webbing is attached.

I found a cool drop in lining tutorial: https://sewingtherapy.net/fennel-fanny-pack-sew-along-tutorial/ though I decided to not go this route on my first run through this pattern (in retrospect a very good plan).

Instead of sewing the belt webbing to the side wings, I instead attached 2 triangle rings so that I could make the belt interchangeable—I have an eventual plan to make a handwoven strap using an inkle loom (!). I cut a 2” long strip of seat belt webbing and threaded it through the triangle ring, then tucked the ends into the fold of the wing piece as instructed.

Materials: 1/4 yd red cotton canvas, 1 fat quarter quilting cotton (I bought this super cute cat print at the Road to California quilt show in 2021.)

Notions:

New skills: n/a

Lessons & Techniques: I ended up trying a few different sewing needle sizes - an 80/12 Universal and Microtex both had intermittent skipped stitches (1 stitch in a seam), a 100/16 chrome jeans needle punched really large holes, and a 90/14 universal needle seemed to hit the sweet spot with no skips and no holes.

The pattern specified a 10” and 14” zipper, however, the actual pattern pieces where you’re attaching the zippers are 10” and 13”. Because I used metal zippers, I positioned the bottom zipper stops 3/8” in from the edge so they wouldn’t be in the seam allowance, and then sewed very carefully where the zipper teeth overlapped with the seam.

Side wings:

  • When sewing the webbing to the side wing pieces, I decided to baste the webbing in place before sewing the 1/4” seam around the piece. This was super handy because gave me a guide for my pivots.

  • Before turning the side wings right side out, I graded the seams.

What I'd do differently: The pattern specified a 10” and 14” zipper, however, the actual pattern pieces where you’re attaching the zippers are 10” and 13”. Because I used metal zippers, I positioned the zipper stops 3/8” in from the edge so they wouldn’t be in the seam allowance, and then sewed very carefully where the zipper teeth overlapped with the seam. Next time, I’ll use shorter zippers (9” and 12”) so that I don’t need to make all of these adjustments. (Fig 1)

Fig 1: The metal zipper I used extended beyond the seam, making sewing a challenge

Fig 2: Cotton webbing dyed grey using Rit dye

I’ll probably interface the inner lining pieces for added stability, especially if I use a thinner cotton fabric for the lining.

The suggested method of rounding the corners of the front and back panels seemed to be a lot harder to sew (at least to me) than sewing straight seams around a rectangular panel. In the future I’ll forego the corner rounding, and instead sew straight seams and clip at each of the corners. I really like the approach in this tutorial where the top & bottom seams are sewn from center to 3/8” before the corner, then the SA is clipped at 3/8”, then the side seams are sewn from 3/8” below the top to 3/8” above the bottom. I also like the tutorial approach for attaching the bias binding (it seemed really similar to a quilt binding) and the suggestion to clip the binding at each of the corners when initially attaching it.

I changed my mind about the beige cotton webbing I originally bought, so I tried dyeing it grey using Rit charcoal grey dye in the washing machine. (Fig 2) Didn't get as dark as I was expecting but I'm still fine with the new shade (and still have plans to make an inkle loom band).

I sewed the end of the webbing around one of the end clips first, then threaded it through the slider, the second clip, and around the center slider bar where I sewed the other end of the webbing. I think it may have been easier to first attach the webbing to the slider center bar, but either way the outside edges of the slider require some maneuvering to sew around.

Care: Spot clean